extensions
In this section, we'll discuss some helpful VS Code extensions. Keep in mind that these extensions may change over time, so their names and descriptions could be different.
You're welcome to install different versions of extensions. If you discover a better extension than the ones mentioned here, please let us know. We'd be very grateful for your feedback.
python
A Visual Studio Code extension with rich support for the Python language (for all actively supported versions of the language: >=3.7), including features such as IntelliSense (Pylance), linting, debugging, code navigation, code formatting, refactoring, variable explorer, test explorer, and more!
extension id : ms-python.pythondrawio
This extension simply integrates Draw.io into vs code.
Draw.io, now known as "diagrams.net," is a popular web-based diagramming and charting tool. It allows users to create a wide variety of diagrams, flowcharts, organizational charts, wireframes, and other visual representations of information. Diagrams.net is often used for tasks like illustrating processes, designing software architectures, creating organizational charts, and visualizing data.
Key features of diagrams.net (formerly Draw.io) include a user-friendly interface, real-time collaboration, support for various diagram types, integration with cloud storage services, and the ability to export diagrams in different formats. It's a versatile tool that caters to both personal and professional diagramming needs and is widely used in various industries for visualizing complex ideas and concepts. Click here to visit the official Draw.io (diagrams.net) site.
extension id : hediet.vscode-drawioHow to use this extension?
When we use draw.io, we want to create diagrams and turn them into image files for later use. To do this quickly and efficiently, we wrote a Python script. This script goes through all the diagrams in a particular file and automatically turns each of them into an image. Lets see how to use it.
- First, we have to install the desktop version of draw.io (alongside the extension we already added). You can do this by clicking on the link provided. Click here
- Add to PATH the draw.io installation folder. In many cases, the installation folder is located in
C:\Program Files\draw.ioorC:\Program Files\draw.io\binand as you can see there is a space in the PATH inProgram Files, if this is the case add the following command to~/.bashrcfile:
export MY_DIRECTORY="Program Files"
export PATH=$PATH:/c/$MY_DIRECTORY/draw.io/
Open new
<your_name>.drawiofile and create your diagram. Please open the file in/static/drwaiofolder. You can do this by clicking on the Open Folder button in the bottom left corner of the VS Code window and then selecting the/static/drawiofolder or clickctrl+shift+pand typeDraw.io: New Draw.io DiagramLets create 3 diagrams in the file. The first diagram will be called
diagram1, the seconddiagram2and the thirddiagram3. You can name the diagrams as you wish. Draw some basic diagrams and save the file. It may look like this: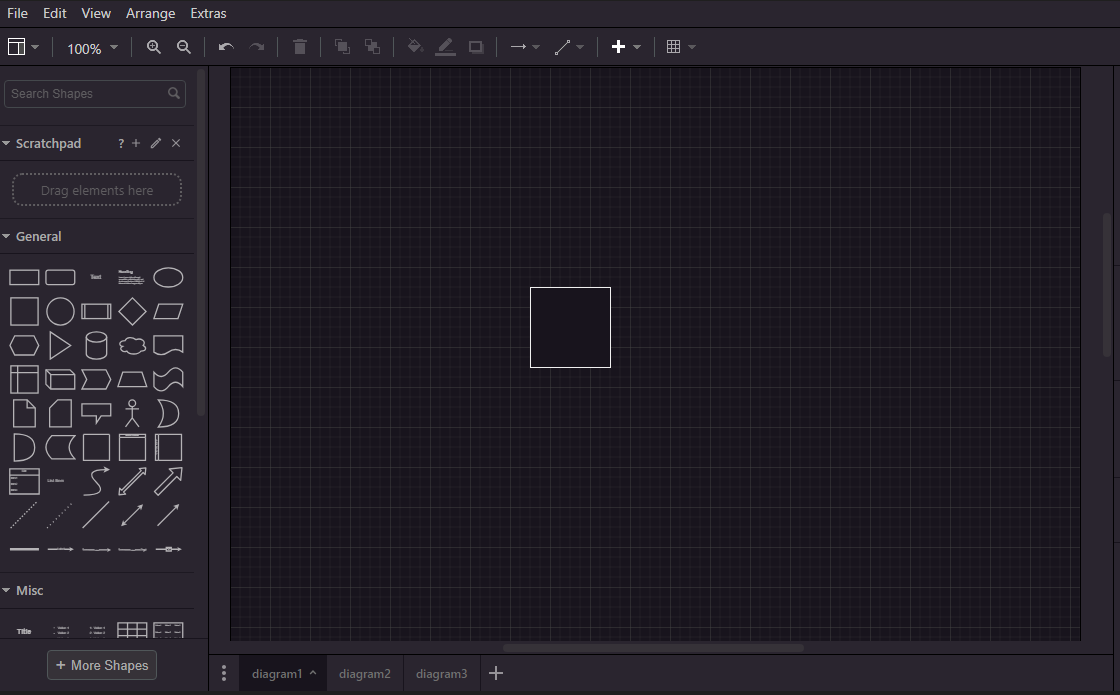
Run the following command
python drawio_export.py -f <file_name>
- Thats it! now you can see that 3 images were created in the same folder as the
*.drawiofile. The images will be named as the diagrams. In our case, the images will be nameddiagram1.jpg,diagram2.jpganddiagram3.jpg. You can see the images in the/static/drawiofolder.
SystemVerilog
This VS Code extension provides features to read, navigate and write SystemVerilog code much faster.
Features:
- Elaborate syntax highlighting
- Go to symbol in document (Ctrl+Shift+O)
- Go to symbol in workspace folder (indexed modules/interfaces/programs/classes/packages) (Ctrl+T)
- Go to definition (works for module/interface/program/class/package names and for ports too!) (Ctrl+LeftClick)
- Find references (works for module/interface/program/class/package names and for ports too!) (Ctrl+LeftClick)
- Quick-start on already indexed workspaces
- Code snippets for many common blocks
- Instantiate module from already indexed module
- Linter capabilites with simulators (more info on the wiki)
- Fast real-time error identification through an integrated SystemVerilog parser and IntelliSense (fully accurate to IEEE Standard 1800-2017)
c/c++
The C/C++ extension adds language support for C/C++ to Visual Studio Code, including editing (IntelliSense) and debugging features.
extension id : ms-vscode.cpptoolscode spell checker
A basic spell checker that works well with code and documents. The goal of this spell checker is to help catch common spelling errors while keeping the number of false positives low.
extension id : streetsidesoftware.code-spell-checkerDiff
Compare documents quick and easily extension
extension id : fabiospampinato.vscode-diffGitHub Copilot
GitHub Copilot is an AI-powered coding assistant developed by GitHub in collaboration with OpenAI. It is designed to help developers write code more efficiently by providing code suggestions, auto-completions, and even generating entire code blocks and functions. GitHub Copilot is tightly integrated with the Visual Studio Code (VS Code) editor and is intended to assist developers across various programming languages and tasks.
extension id : GitHub.copilot- Please note that this extension is not for free. Paying policy
Additional Github extensions
- GitHub Actions. extension id : github.vscode-github-actions
- GitHub Codespaces. extension id : GitHub.codespaces
- GitHub Copilot Chat. extension id : GitHub.copilot-chat
- GitHub Pull Requests and Issues. extension id : GitHub.vscode-pull-request-github
Paste image
The "Paste Image" Visual Studio Code (VSCode) extension is a tool that allows you to easily paste images from your clipboard directly into your code editor. Instead of saving an image to a file and then manually inserting it into your code or documentation, this extension streamlines the process. --How to use it--
- Copy an image to your clipboard or use a screenshot tool to capture an image(window + shift + s)
- Open the command palette (Ctrl+Shift+P) and search for "Paste Image" or use the shortcut (Ctrl+Alt+V) and that's it!
- The image will be pasted into your current file at the cursor position
- The image will be saved in the same directory as your current file
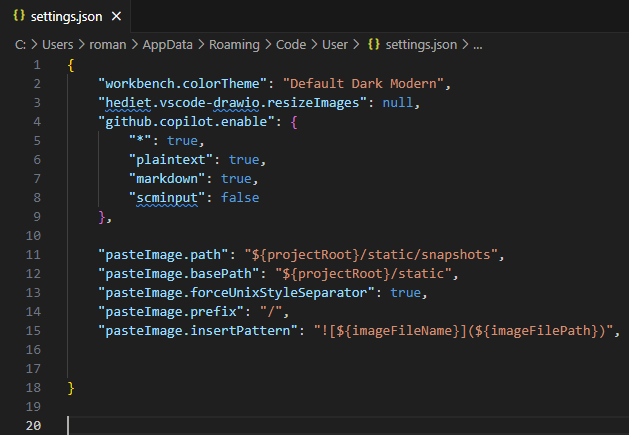
To set the folder where images are saved, use the "Paste Image: Set Image Path" command. You can also set the default image path in your settings.json file. To do this open the command palette (Ctrl+Shift+P) and search for "Preferences: Open Settings (JSON)" and add the following line to your settings.json file:
"pasteImage.path": "${projectRoot}/static/snapshots",
"pasteImage.basePath": "${projectRoot}/static",
"pasteImage.forceUnixStyleSeparator": true,
"pasteImage.prefix": "/",
"pasteImage.insertPattern": "",
This is how the settings.json file might looks like:
We encourage you to "play" with the "Paste image" settings and find the best configuration for you.
Waveform Render
https://wavedrom.com/tutorial.html
Draw timing diagram waveforms with WaveDrom inside VSCode.
Saved waveforms will be located in /static/waveforms folder.
After installation:
- Go to
/static/waveformsfolder and create file with.jsonextension. This file will contain your waveform code. - Write your waveform code inside the file. (you may use the code below as an example)
- Keep
*.jsonopened and press Ctrl+k+d to render the waveform. - Use Paste Image extension to paste the waveform into your markdown file.

This is a code example of *.json file, feel free to play with it
{
  "signal": [
    {"name": "clk", "wave": "p..........."},
    {"name": "core2cache_req.valid", "wave": "0101.....0.."},
    {"name": "core2cache_req.opcode", "wave": "x3x4.....x..", "data": ["read", "write", "write", "write", "write", "write"]},
    {"name": "core2cache_req.address", "wave": "x3x4.....x..", "data": ["0x05", "0x08", "0x08", "0x08", "0x08", "0x08"]},
    {"name": "core2cache_req.data", "wave": "xxx4.....x..", "data": ["0xA8", "0xA8", "0xA8", "0xA8", "0xA8"]},
    {"name": "core2cache_req.reg_id", "wave": "x3xxxxxxx..."},
    {"name": "cache_ready", "wave": "1.0.....1..."}
  ]
}
Documentation and example can be found click here
https://wavedrom.com/tutorial.html
Git History
The "Git History" extension for Visual Studio Code is a powerful tool that enhances your Git version control experience within the VSCode environment. This extension provides a seamless way to explore the commit history of your Git-managed files and repositories directly from the code editor.
Key features and functions of the "Git History" extension include:
File History Viewer: It allows you to view the history of a specific file, providing a timeline of commits and changes made to that file over time.
Commit Details: You can access detailed information about each commit, such as commit messages, authors, timestamps, and the changes made in that commit.
Comparison: It enables you to compare different versions of a file, making it easy to see what was added, modified, or removed between commits.
Search and Filtering: It provides search and filtering capabilities, allowing you to locate specific commits, authors, or messages within the commit history.
and many more...
Overall, the "Git History" extension simplifies the process of tracking changes and understanding the history of your codebase, making it an essential tool for developers who rely on Git for version control in their VSCode workflow.
How to use it?
suppose you want to see the history of a specific file.
- Open the file you want to see its history.
- Press
ctrl+shift+pand typeGit: View File Historyand press enter. Or right click on the file and chooseGit: View File History.
GitLens
GitLens supercharges the built-in capabilities of Git in VS Code. It helps you visualize code authorship at a glance via Git blame annotations and code lens, seamlessly navigate and explore Git repositories, gain valuable insights via powerful comparison commands, and much more.
extension id : eamodio.gitlens